 |
|
Chapter 4. Back end structure: administrator view
- Table of Contents
- The administration functions
- The Preferences Page
The administration page is reached by calling the page admin.php (www.yoursite.com/admin.php) and carrying out the login procedure inserting your user and password. (Remember that the normal users should not login from the page admin.php but from the appropriate module).
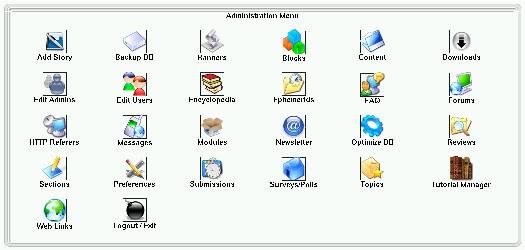
Once logged in, the administrator finds an interface that lists all the areas which can be acted upon (see Figure 4-1). If the administrator is a superadmin, he may work on all the areas of the site, if instead he is an administrator with limited powers he will see the links relative to the areas on which he is allowed to work. Through the preferences configuration we will be able to decide whether to display icons or just a textual interface. According to our choice either a textual or an icon administration interface will appear. Figure 4-1 shows the interface with the icons, as you can see.
Remember that when you write new administration modules you must also create the corresponding icon, otherwise, when in visual administration mode, only the textual link corresponding to your module will appear and you won't be able to click it.
In order to set up the graphical administration mode you must go to the preferences section and set up in "graphical options" the "graphical menu in administration" option to "yes".
The administration functions
- Function "add article":
It is the function that adds a new article to the News module. The options offered are many and will be analyzed here for one (see Figure 4-2):
Topic: Determines which Topic will be associated with the article.
Category:Determines which Category will be associated with the article.
Publish in the Homepage: if this option is not selected, then the article will be displayed only in the topics or the relative categories and not in the main page of the news module .
Activate comments: If it's not activated the users cannot comment on the article.
Language: If in the preferences we have activated the multilingual option, we will be asked in which language we will publish the article. (e.g. if I publish an article in english, I will see it displayed only if I click on the small english flag in the languages block and so on...).
Extended Text: It is the text that appears when we click on "read all".
Programmed article: The administrator is given the ability to choose when the article should be published, deciding on the publishing date and hour. It is not a neccesary function but it is very useful.
Preview or send: Depending on the choice made here determines whether the article will be displayed in preview mode or directly published.
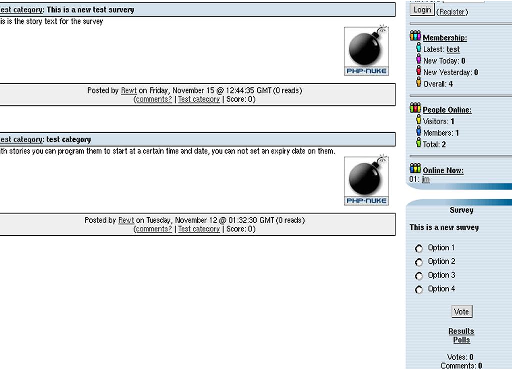
Survey: It is possible to attach a survey to a specific article. In the case that this option is activated, when the reader clicks on "read all", a survey block like the one shown in the screenshot will appear.
- Function "Backup DB":
It is the function that allows us to create a backup file that contains both structure and content of the PHP-Nuke database. This is very useful in case our data gets lost. Once we click on "Backup DB", we will have to wait for the server to create the file. Waiting time varies from a few seconds to some minutes in the case of a large database. Once created, we will be asked to download the file. Remember to keep your backup in a safe place!
- Function "Blocks":
It's a very important function because it allows us to control the left and right columns of our portal. The scheme is presented with a list of the blocks that we have created, we can then activate, deactivate or edit them changing their position and order and assigning them permissions. We can in fact decide if a block should be visible by all, only by the registered users, or only the administrator. We can also make the block visible only in a specific language.
Please note: This info is also present in Chapter 8
The PHP-Nuke blocks can be of 3 different types:
RSS/RDF: They are blocks that capture news from other sites that are put at our disposal, the files are in a standard format suitable for reading the text contained in them. (For example the site Spaghettibrain.com gives news to other sites).
Blocks of content: They are blocks which we insert simple HTML or text that will be displayed inside the block (see the following example)
Blocks of files: They are PHP scripts that execute predetermined commands (see the following paragraph)
In order to create a new block that will be added to the list of available blocks, we must scroll down the page and position ourselves on "add block".
The title field is a common element for all and will be compiled in.
If we want to create a RSS/RDF block we must choose the news source from the available list or add one by clicking on “setup”. In this case we will supply the address of the file to read (this info generally will be supplied by the webmaster of the site from which we capture the news, or, if it is a site created with PHP-Nuke, simply by asking for the file backend.php of that site). The other fields will all be compiled in with the exception of “filename” and “Content”.
If we want to create a block of simple text instead, we will omit the field “RSS/RDF file URL” and will complete “Content” instead (Omitting ”filename”).
If instead we want to include the PHP files that interface with a database or perform particular functions, then we will omit “Content” and “RSS/RDF” and will choose between the available files the one that will create our block. (If you want more info on how to create blocks, see Chapter 8).
Remember that before publishing a block a preview will be shown to us.
<! -- pagebreak -- >
in order to create a multipage article.
- Downloads:
It creates categories, subcategories and adds files to the download area. For security reasons, the system does not allow file uploads via HTTP, only their linking through their HTTP address. If for example the file files.zip is found in the directory files of our site, we would have to link it as www.oursite.com/files/file.zip. This allows us to link external resources also.
- Edit Administrators:
Enables us to add new administrators, defining their access levels. Besides having a super administrator it is in fact possible to activate only partial functions for the various administrators.
- Edit Users:
From here it is possible to manually add new users and to modify existing ones, choosing their profile by typing the nickname in the appropriate form.
- Encyclopedia:
Allows the creation of multiple word lists (choosing also the language), after having created an encyclopedia we can proceed to the insertion of terms.
- Ephemerids:
Allows the insertion of recurrent events choosing the date and inserting a description.
- FAQ:
Allows the creation of the main FAQ categories and all related questions/answers.
- Splatt Forum:
The management of the forum is divided in 4 areas:
Preferences: It manages the characteristics of the forum (For security reasons it's advisable to deactivate the option to mail in HTML).
Categories and forum: defines the categories, the forums included in them, the moderators of every forum, levels of access etc... For a forum to be visible, you MUST activate at least one moderator otherwise the forum won't show up!
Ranks: defines the attention thresholds for the forum. Upon reception of the nth post, aproppriate images will be attached to attract proper attention of the visitors.
Users: moderator management through a complete list of the registered users.
- HTTP Referrers:
It displays the origin of the last accesses to the site.
- Messages:
It creates a central block in the Home Page in order to send selective messages to the users. The messages can be sent to only registered users, to non-registered users, to the administrator or one may carry out a selection by language.
- Modules:
Allows the management of the modules installed. The modules can be activated, deactivated or be assigned read permissions. A module can be world-readable, readable only by the registered users, or only the administrator.
- Newsletter:
the PHP-Nuke administrator can send a newsletter to the registered users who have consented to receive them or send them to all the registered users. Attention to spam!
- Optimize DB:
Optimizes the data increasing database speed.
- Preferences:
This subject will be treated in the Section called The Preferences Page.
- Book Reviews:
It allows us to insert book reviews. In every book review it is possible to cast a vote, a link relative to the subject and finally an image that represents the content.
- Section Manager:
it manages the sections and contents thereof. It is possible to associate an image to the section subject, just as it is in the topics. It is possible to add articles to the sections selecting the aproppriate category through a radio button, to divide long texts using the <! -- pagebreak -- > tag and to edit or cancel already added sections.
- Articles:
Manages articles inserted by third parties. It is the moderation area of the News module that we have already analyzed in this section.
- Survey/Polls:
Creates a new survey for the site, edits or cancels old ones. It is possible to insert up to 10 different answers to every survey. In the context of the creation of the survey it is possible, on the same page, to publish a news article that announces its creation.
- Topics:
Allows you to create new topics and the association, through a pop-up menu, of corresponding images.
- Links:
Allows us to edit links published by others, create categories for archiving the links, eliminate links, see user messages informing us of any broken links through an interface very similar to the downloads section and add new links.
- Logout/Exit:
Exits from the administration area rendering the cookie invalid. It is good practice to login logout after having finished working with PHP-Nuke. For security reasons.


